

How to Build a T-Bucket Hot Rod Roadster for Under $3000 eBook
$19.99
The Revised Digital Edition of “How to Build a T-Bucket Hot Rod Roadster for Under $3000: kickin’ it old skool” is only $19.99. For that, you get 258 pages, with over 400 photos, templates, diagrams and illustrations that will reveal to you every detail of how to build your own T-Bucket hot rod roadster on a budget. Learn everything you’ll need to know that will save you time and money by being able to scratch build your own truly custom T-Bucket hot rod! You are no longer limited by T-Bucket “kits” or T-Buckets for sale. Hey, even if you’re thinking about buying a T-Bucket you’ll want this to be able to know what you’re getting and drive a better bargain, too.
NOTE: Only available as a digital download PDF file you read and/or print out from your computer. Hard copies are NOT available. We found that most t-bucket builders want their info fast and cheap.
Description
If you’re a T-Bucket fan, if you’re planning to build a T-Bucket or if you’re thinking about buying a T-Bucket and want to be the smart, informed buyer who knows what he’s bargaining for, “How to Build a T-Bucket for Under $3000” is exactly what you need.
It’s been called “The most complete Hot Rod how-to ever written!” Not too long ago, T-Bucket builders paid over $200 for it if they could find a copy. Why? Because professional T-Bucket builder Chester Greenhalgh poured years of blood, sweat and tears into revealing every detail of how anybody can easily build a T-Bucket hot rod on a beer budget, using readily available everyday materials and junkyard parts (or new ones, if you prefer).

Digitally Remastered, Revised Edition

You get 258 pages, with over 400 photos, templates, diagrams and illustrations. Now it’s even better:
- The Revised Edition has been “digitally remastered”. Those dull old typewritten pages are gone!
- Every page is clean and sharp and prints easily.
- Dimensions have been added to drawings and templates.
- Text and drawings now feature color highlights.
- Incredibly clear photos: compiled from original photographs (rather than scans of printed photos).
- Plus, many beneficial edits and updates make it even easier to build a T-Bucket.
- You’ll love it!
See for yourself! Take a look at what’s in this extensive, 250+ pages of practical “how to” build a T-Bucket information. Here’s everything that you will learn to save you time and money, and be able to scratch build your own truly custom T-Bucket hot rod! You are no longer limited by T-Bucket “kits” and T-Buckets for sale — and now this legendary, money-saving tool can be yours for not much more than you pay for a case of decent beer!
“How to Build a T-Bucket” Table of Contents
- Frame: Complete detailed T-bucket frame plans with dimensions and templates, including front and rear spring perches, steering bracket, radius rod brackets, shock and body mounts. Best and easiest ways to cut, weld and triangulate the frame, prepare, prime and paint finish. Includes complete Bill of Materials and suggested bargain sources. By the way, this is where 90% of other T-bucket plan sets END!
- Body: What is really cool is that the first fiberglass T-Bucket bodies were introduced in 1957 for $149. If they had kept pace with inflation, today you would have to pay $1127 for one. Fortunately, most T-Bucket bodies today cost about half that amount! How to get the best deal on your body. Wood reinforcement for the fiberglass body. The cheap and simple technique that will make people think you have a STEEL T-bucket body. Installing the floor and transmission cover. Cutting the body for bellhousing clearance and to channel body over frame. Working with fiberglass. Seat riser construction, windshield bracket reinforcement, and hidden tool compartment.
- Pickup Box: Instead of buying a fiberglass T-bucket pickup box, how to build your own from junkyard parts and make it strong enough to sit on, actually haul stuff, or maybe even use as a rumble seat for the kids!?

- Bodywork: Removing mold release from your fiberglass T-bucket body, sanding and “On the eighth day, God created Bondo.” How to set up your Bondo table, how to use a body file and finish sand. Working with Feather Fill.
- Painting: A professional’s tips for garage painting your T-bucket. Lacquer, enamel, acrylic, urethane, or water-based paints? Tips on how to incorporate different color panels over a base color, fading in colors, striping, etc. for a truly professional custom paint job. How toothpaste fits into the picture and why you should avoid drugstore striping tape.
- Springs: Front and rear transverse Ford-type springs. Don’t have to be Ford, though. How to rebuild and refinish old springs. Spring lubrication methods. Templates for spring alignment strap and spring perch bottom plates. Build a low-buck, shiny spring perch cover from roof flashing. Alternative cheap or free spring sources for your T-bucket hot rod; where to look and what to look for.
- Front Axle: Low cost T-bucket front axle options: early Ford, old pickup trucks, Econoline. How to make that dual semi-elliptic truck axle look good with a transverse spring (including how to Bondo a front axle). Low cost disc brakes. How to build the poor man’s four bar and make your own low-cost friction shocks. Eliminate the rare, costly Corvair steering box, with other GM and Ford choices, including the school bus box that will feel like power steering! Templates for batwings (radius rod brackets), spring hangers, shackles, steering arms, and shock mounts. Drag link construction. Front end alignment.
- Rear Axle: How to prepare inexpensive GM 10 and 12 bolt rear ends, and give them some flash. Rear batwing templates. Junkyard tie rod ends as an alternative to expensive heim joints when you build a T-Bucket (important when you’re using 15 of them in the overall build). Building and attaching rear spring hangers. Adjusting pinion angle. Rear shackle alignment.
- Rear Radius Rods: The T-bucket hot rodder’s truly low cost radius rod solution. It’s something that has been used successfully for years. With gussets template and infomation on how to make radius rod adjustments.
- Steering Column: Build your own using a chrome exhaust pipe extension, a cheap bearing and old radiator hose scraps. Steering column floor support template. How to find and refurbish the lowest of low-buck T-bucket custom steering wheels.

- Firewall: Easiest way to make your T-bucket firewall template. Variety of materials, what to avoid using. How to attach the firewall and how to shorten transmission dipstick for clearance, if necessary.
- Engine: What to do before you pull the engine from your donor car, how to clean it up, how to paint it, and how to get the most from your chrome dress up bucks. How to build your T-bucket motor mounts, including templates. Fan spacers for most efficient cooling. How to build your transmission mount, with templates.
- Brakes: How to adapt intermediate GM disc brakes to early Ford and Econoline axles, including templates for building your own adapters and saving even more money. Building an integral brake pedal/master cylinder assembly that removes from the frame of your T-bucket in one piece for easier servicing. Diagram and instructions for laying out your brake lines, including proportioning valve, and how to plumb them. The poor boy’s Coke bottle method for brake bleeding. Installing a junkyard find emergency brake. And, for the really bucks-down builder: how to turn your own rotors, the cheap way.
- Radiator, Mounts and Shell: Page and a half of $50 or less junkyard or low-cost parts store alternatives to the high dollar ($350+) T-bucket radiator dilemma. Templates for brackets to mount radiator to chassis. A unique alternative to the model T radiator shell. Mounting the shell to the radiator. Low cost, hardware store grille filler. How to build your own decorative radiator cap from a 2″ chrome exhaust extension and a busted, swap-meet moto-meter. Hazards to avoid like lightweight racing fans (72 stitches and a hand that will never hold a Coke again — true story about a friend).
- Battery Box: Using bedrail to build an out-of-the-way, underframe battery box for your T-bucket so you don’t use up all your pickup bed space; plus a low-buck hardware store louvered soffet to cover up that “el-cheapo” battery.


- Driveshaft: Dune buggy proven, do-it-yourself driveshaft shortening method that’ll save big bucks for any T-bucket builder. Super special bonus: bathtub balancing your driveshaft!
- Fuel System: How to plumb your T-bucket fuel system, gas tank alternatives and how to build your fuel tank mounting brackets.
- Headlights and Taillights: Best sources for cheap T-bucket hot rod headlights. Save by building your own headlight brackets. Super-cheap, off-the-shelf, buy-’em-anywhere taillights and how to build simple mounting brackets for them.

- Dashboard: Easy technique for building your own custom wood dash, with deep wood grain finish. How to cut holes for instruments, turn signal indicators and bright headlight indicator. Best of all, wire this custom dash outside of your T-bucket to avoid standing on your head and take it out for servicing by loosening two screws.
- Electrical System: This chapter alone will save you 90% off the purchase price of a specialty T-bucket wiring harness and you can avoid ten times the headaches. If you’re using a small block Chevy, you don’t even need to look at the schematics because complete simple, step-by-step wiring instructions are given. Ford wiring diagram included just in case you’re a rugged individual. No need to spend big bucks for a wiring harness. Simple wiring components readily available at Radio Shack or your local auto parts store. Where to locate cheap gauges and suggestions for cool junkyard speedometers.
- Gas Pedal: You gotta have something to stomp on to go fast. So, how to adapt a junkyard gas pedal to your T-bucket, along with routing the throttle cable.
- Gear Shifter: Again, save big bucks by building your own nostalgic, long-arm T-bucket floor shifter for your Turbo-Hydro 350 or 400. Where to locate cheap, long shift arms and unique, cheap shift knobs. Plus, if you’re lazy, how to hook up a Ford Mustang shifter instead (p.s., doesn’t even have to be a Mustang — Pinto will do).
- Upholstery: Poor man’s quick and easy T-bucket upholstery for the interior side panels, seat bottom and back, seat riser panel, floor and firewall. And, if you decide to turn the upholstery over to a pro, the techniques and prep covered will save you a couple hundred dollars. Chester’s unique pickup bed cover construction, which can double as a “rumble seat” if you’re just cruising the fairgrounds at 5 mph.
- Windshield: Again, save big bucks by being able to build a T-bucket windshield frame that can be polished to a chrome-like finish. Make your own windshield support rods and give them a low-buck chrome effect. Rear view mirror and windshield wiper considerations included.
- Suppliers: Sure, you can find most suppliers you’ll need on the Internet today, but here are a few sources for some of the T-bucket build components you either can’t find in a junkyard, make yourself, or purchase locally.
- Epilogue, Titling your T-Bucket: Not legal advice, but some words of experience on how to most quickly and economically figure out this vital step to getting your T-bucket on the road.
EVERY detail of how to build a T-Bucket is covered: absolutely your best hot rod investment!
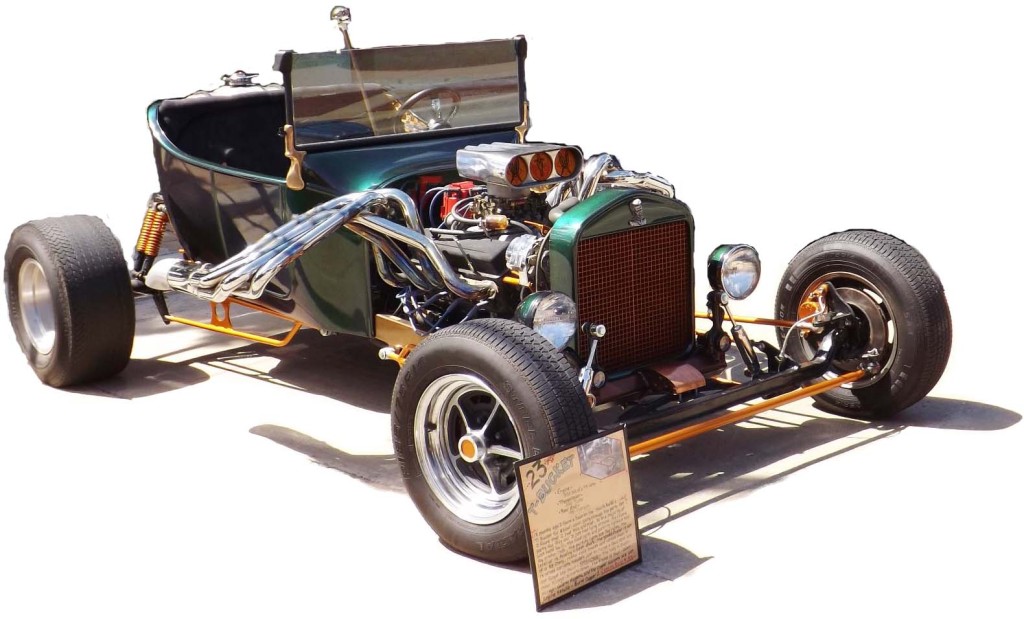
You can use the valuable information in your eBook to build any kind of T-Bucket you want: a 60’s era T-Bucket, a “Fad-T”, a “Kookie” T or a traditional T-bucket just like Chester’s flathead powered T shown below which, aside from the fiberglass body, used no parts newer than 1952!

What Purchasers Say:
Just what do purchasers of Chester’s legendary hot rod “how to” eBook have to say about it? Here are just a few comments and we hope to add yours, too:
So, I ordered my first eBook. And, I have to say the book is awesome … it’s pretty much the bible of … building not just a T-Bucket but any hot rod.
This how to build a t-bucket book is not like others … but ‘how to’ step-by-step put one together with an emphasis on not buying parts but making them yourself or, if you have to, where to and what to buy that is cheap and still safe.
The thing I liked about this book is, it covers every freaking thing it takes to build a T. Most just cover the basics. It’s all those little things that will get ya when you build something.
I am glad I bought this book … not because I want to build a T-Bucket but because it has down to earth ways to build a hot rod … which can be adapted to any vehicle you are making.
This book has a lot of info for someone who hasn’t done it before … I have purchased many ‘how to’ books and each disappointed me due to the lack of real info needed.There’s a lot of great info in it that supplements some of the material I already have, and lots of stuff in it that I don’t have. And what can you really buy for (less than 20) bucks these days?
Good stuff and maybe it will get some of the ‘I can’t afford to build a hot rod’ guys thinking and doing.
I just got mine. Section alone on radiator sizes is worth the price!!
It was this book that I showed to a friend that was just getting into drag racing. He had a ’73 Nova and was about to spend a fortune on it. I showed him the book and said wouldn’t you rather have something like this than that Nova? He already had an engine and I gave him the cost vs. cost … weight vs. weight, etc. Well, the decision was made. He wanted a “T” … LOL. We made a few changes from the book but as I said it was the book that steered the way. I don’t think he will ever let it go … too much fun. Come to think about it … he still has my book!

I’m an advanced rodder and like other advanced rodders rarely need a how to book. But in the blurb about the book it was mentioned that there was a cheap way to make a good looking windscreen frame. So I bought the book primarily for that info which I find very helpful.
For a novice/intermediate rodder it should be a very helpful book … it is quite a good book. There are various patterns and templates included, even patterns for the mounting brackets for disc brakes on a beam axle.
I thought the way things were explained was great and how you went into detail. I found the electrical section to be especially helpful. All books and magazines dealing with cars should be written this way!
This book has built at least 5 T-Buckets over the years for me and friends. I would never sell mine at any price … Over the years I would hit a spot on a build and just not be sure what to do next. Without a doubt Chester has pulled me through some of those tough spots with his ‘Common Sense’ approach.
This new ebook contains a TON of good information on how to build a hot rod T-Bucket …
So, just what is this eBook thing?

Instead of ordering your Hot to Build a T-Bucket book printed on paper, having to pay shipping and, worst of all, waiting who knows how long for it to arrive — order your eBook and be reading, enjoying and using it in a shade over 5 minutes. Click the “Download Now” button below and you’ll be securely directed to PayPal to make your payment. You don’t even have to have a PayPal account. (Just look for the “Don’t have a PayPal account?” link to purchase without having a PayPay account). Oh, we forgot to mention that the next best thing to getting it quickly as an eBook is getting it cheaply. After you’ve paid, you’ll be automatically directed to our secure download area and you will also receive an email receipt from us with a copy of your special download link. Simply click on the download button to save the PDF file to your computer and be patient for a couple minutes because the newly revised version features such sharp photographs and graphics, it’s a 37MB file with 258 pages and may take anywhere from two to five minutes to download, depending on your Internet connection. Then you’re ready to start using Chester’s tons of valuable information which you can read on your monitor or print it out.
The Newly Revised Edition of “How to Build a T-Bucket Hot Rod Roadster for Under $3000: kickin’ it old skool” is only $19.99. For that, you get 258 pages, with over 400 photos, templates, diagrams and illustrations that will reveal to you every detail of how to build your own T-Bucket hot rod roadster on a budget.
Just click on the “Add to Cart” button to securely purchase “How to Build a T-Bucket” through PayPal and then immediately download tons of great hot rod “how to” information that will save you thousands of dollars, make your projects go faster without unnecessary frustration and keep you entertained for hours as a bonus!
Thank you, and don’t hesitate to use our Contact Form if you have any questions or problems.
58 reviews for How to Build a T-Bucket Hot Rod Roadster for Under $3000 eBook
| 5 star | 86% | |
| 4 star | 8% | |
| 3 star | 5% | |
| 2 star | 0% | |
| 1 star | 0% |
Customer Images


Related products
-

1970s T-Bucket Plans by Ohio Street T’s eBook
$7.99 Add to cart -

Bird T-Bucket Plans eBook
$7.99 Add to cart -

Free T-Bucket Plans – the “Youngster” Free T-Bucket Plans eBook
$0.00 Add to cart -
 Sale!
Sale!

T-Bucket Master Plans Digital Downloads Package
Original price was: $59.95.$39.95Current price is: $39.95. Add to cart
Pictured are hard to see but useful
It’s an educational read,I’m on the third reading trying to grasp everything as the pictures did not turn out very well well. I’m finishing a project now and I think I’m going to try and build a “T” bucket next.thanks Don
Using this book to setup a tbucket with a decent amount of power. It’s nowhere near complete, but with how complete and full this guide is, I’ve been able to push through with little to no issues at all.
I bought this download 8 years ago and I built a 1927 c cab from it
Cool C-Cab Thomas. That’s what it’s all about rolling up your sleeves and applying some ingenuity. Thanks for sharing!